Blog
5 December 2021
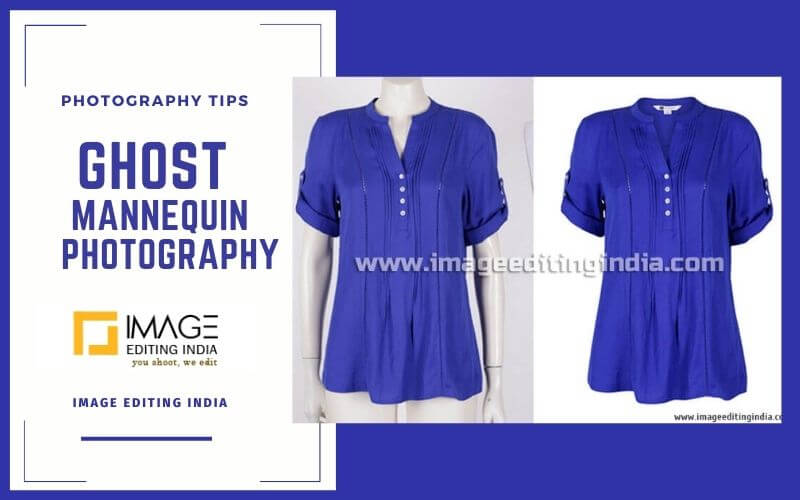
What is Ghost Mannequin Photography? 4 Ways to Get a Ghost Mannequin Effect
There is real photography, and there is photography effect as well. And Ghost Mannequin photography falls in the latter category.
What is Ghost Mannequin Photography?
You would have heard about mannequin, what these products are and what these are used for – placed around retail stores. While in a physical store you can place a real mannequin, in the online world or eCommerce stores, ghost mannequin or invisible mannequin photography helps to give a 3D effect.
Creating a hollow man effect helps to allow the products like jeans, shirts, blazers, jackets, and more to hold their shape. This result in a more consistent and professional layout, enabling viewers to imagine how those certain products will feel and appear on their body.
Ghost mannequin photography ensures brands and retailers are able to shoot and promote their products bringing the inside of the cloths to life effectively, which can be hard to achieve with other composting techniques. It is not just an effective but also highly cost-effective way to promote products in online stores or through other digital mediums.
How to Achieve Ghost Mannequin Photography?
This is not a one-tool and one-step process to achieve creating invisible or ghost mannequin photography. Here, we are going to take you through the entire journey below.
Equipment Needed
-
- Ghost Mannequin
The most important component you will need is a modular mannequin having removable arms and chest. While you can use a model, but using a mannequin helps to achieve consistency in images.
-
- Studio Lighting
You would want to get the best, wide angles and focused shot, thereby it is recommended that you chose a studio having good lighting exposure, such as LED lamps, achieving consistency, in contrast, shadow, and light exposure.
-
- Camera
Ensure that you are using a high-end quality camera that will help you capture the images specific to the desired result.
-
- Clothing
What garments do you want to showcase on the mannequin? Usually, the most fitting ones are coats, blazers, shirts, jackets, and even dresses.
-
- Styling Fixtures
Using tools like pins, clips, tissue, tape, and as such helps to ensure clothes are fit over the mannequin appropriately.
Process of to Create Ghost Mannequin Photographs
1. Setup the Studio
The first thing now is to set up your studio customized to your needs. Remember that your background has to be specifically white, unless you are going a bit different (but white is what almost all ghost mannequin photography techniques follow).
White background means colors of clothes aren’t overexposed, the white balance calibration is accurate, a reflection of white onto the image creates consistency, and also allows removal of background later on easy using Photoshop.
Use a tripod that keeps your camera consistent and steady. Position the camera at least 5 feet away from the backdrop, and in a way that fills the entire frame with the product and white background. Have sufficient lighting in the studio, allowing as much natural lighting as possible. If using artificial lighting, then you should adjust accordingly.
2. Dress Up the Mannequin
Now, before shooting images, you should dress the mannequin properly. Before you dress, ensure to check the clothing items for smudges, creases, stains, and such aspects. For any creases or as such, keep an iron or a wet cloth ready to not let such a problem appear (this can be edited later but why leave that for afterward). Dress the mannequin gently and steadily.
3. Capture the Shots
Before taking the photos, remember to note that during the editing stage, later on, you will have to stitch two shots digitally together. Shoot the tops first, then the bottoms, and then full-body outfit shoot, ensuring efficiency and consistency.
Step-wise first is to capture the garments’ front face-on. Second, after taking off the garment, turn around the mannequin precisely to 180 degrees, dress it up again in an inside-out way (to get a clear view of the tag area and hem’s lower back), and capture the photo keeping the camera settings same.
If you want to get the rear view of the garment, follow the same process but flip the directions, meaning capture of the mannequin’s back with the proper way of product and mannequin’s front with inside-out product use.
4. Edit the Photos
Now, mannequin photos have completed only the capture part, and now it is about editing by using photo clipping service and giving the final touch:
-
- Import the images in the Photoshop
- Open one mannequin image (say mannequin front image)
- Create a new background layer
- Using the selection tool, now select the product in the image
- Refine the mask, and then eliminate all the background and the mannequin
- Repeat the above steps for the other image (say mannequin back image)
- Now it is time to combine both the images following the right procedure in Photoshop
- Remove any unnecessary element
- Now add shadows, and then save the finished final mannequin image
In product photography, ghost mannequin photography is an upcoming, new kind of photography and one that is gaining high traction in the times of eCommerce. For any interested and passionate photographer, this can be a great and exciting professional field to foray into. You can also take help for ghost mannequin photo editing services from a professional photo editing service provider.